Friday, April 8, 2016

Olaplex - #mmmreview


 Hi! This is a simple review for Olaplex, the hair stuff that everyone from here to the UK is talking about! I am very cheap (as you may know) BUT I decided to try this because everyone is raving. I got it from Amazon for $23 (direct link below).

https://www.amazon.com/gp/aw/d/B015B9A91E/ref=yo_ii_img?ie=UTF8&psc=1

It wasn't easy to wait for my miracle product, but the two days passed... And I got this teensy little bottle of potential. I have a lot of super fine hair so I was nervous that it wouldn't be enough (Spoiler alert: It was). 


From the Amazon site:

Description

The No.3 Bond Perfector is designed for at-home use. It is best to apply to clean, towel-dried hair. If build-up is present such as oils or silicones, shampoo and towel dry before application for best results. This is NOT a conditioning treatment OR a leave-in treatment. It is meant to be shampooed out of the hair. No.3 must process a minimum of 10 minutes. If hair is compromised, 20+ mins is recommended. Once a week is suggested for healthy hair

Features

  • Step 3 of the Olaplex Professional System, for once-a-week, at home applications to eliminate breakage from chemical services
  • Apply a generous amount from roots to ends on towel-dried hair. Use once a week between chemical services to strengthen hair. Comb through once. Leave on for a minimum of 10 minutes or more
  • Rinse from hair. Shampoo and condition

This is my hair pre-treatment. 

This is how I applied it (per 'Features' above). 
My method:
*I separated the top two parts of my hair with clips then I saturated the back mid-to-length with the treatment 
*Next, I did the front portions of my hair all the way to the roots;especially the crown, where I have a lot of breakage. *Last I made sure to get the pieces that frame my face and the very ends & then covered it with a target bag. (MMM note: a shower cap IS better!)

I left it on for about 5 Adele songs & cleaned my bathroom. 

And... 
So... Not too bad, for a $12 at home treatment & 25 minutes of my morning. All jokes aside, my hair feels lighter and better especially at the crown which is usually a crispy mess, TBH. Is it better than the ION from Sally Beauty? Yes. But is it worth the $$? I'm going to have to say YES. I'd especially recommend this for anyone that has long hair, processed hair or excessively heat-styled hair. 

The second half of the bottle will be used by my daughter, who has very thick shoulder-length hair. I plan on posting her photos & result in the comments after I can get Sassy to do the treatment ;)

I've already ordered a second bottle to use to prepare for my twice yearly cut (gulp) which I know I need, but dread like like mad. I'll post those pics in the comments also. 

I've always got my eye out for a good hair repair treatment, so please leave your recommendations in the comments!

Disclaimer: I haven't been paid to endorse Olaplex (or any product ever)& all I know about hair is what I've learned about my own & my sassy daughter's through trial/error... Treat at your own risk :)


Sunday, April 3, 2016

Lock Laces are AWESOME - MMM Review

These have SAVED our mornings!


My Little Tyke has always loathed putting on his shoes. He has trashed dozens of pairs of Velcro shoes because he pulls them SO tight. We were literally buying a pair of shoes a month because of it! Even when the shoes were passable, I dreaded leaving the house b/c a shoe-induced screaming-and-tears tantrum was a probability.
Last summer we found sandals with this kind of bungee cord and clamp setup and they were a day-saver! But of course they wore out and we just could not find another pair.

He cried. I cried. It was ugly.

I tried different kid of laces (the curly ones, flat elastic, lace keepers, etc.) We continued to practice shoe tying, and MrDad actually helped him somewhat master the skill but the combination of tricky fine-motor  skills and easy frustration makes it a hassle and distraction at school. 

Then someone recommended Hickies. They were a little more than I wanted to spend, but then the LOCK LACES popped up in Amazon's "recommended for you". They looked exactly like the sandals laces and they come in tons of colors, most importantly red. SOLD.

I could not wait to get them and when we did we were not disappointed! LOCK LACES sent a nifty how-to video via email after we ordered so they were super easy to put into some lace-able shoes we had. 

The next morning was a dream come true. Little Tyke loved the color, how tight he could pull them and that they clamped easily. That morning was one of the best school-day mornings we have ever had.


These are shoes are less than a month old (which isn't uncommon for LT) but this is the third pair of shoes we used our original pair of Lock Laces on!


Brand new pair of shoes and brand new Lock Laces... Because I will not be without them. (LT loves red with every fiber of his being, so we just keep buying the same pair.)

I recommend these to everyone and our house will never be without a pair (or two or six). THANK YOU LOCK LACES :)


I was in no way compensated to post this review; I just absolutely believe these laces are a God send for LT's shoe-sensory issues. 

But hey, @LOCKLACES, if you want to hook LT up, he'd be as gleeful as this guy


Thursday, March 31, 2016

Flip-Flop Foot Detox - #pinwin

Take it from me, you can count on two things happening in AZ around mid-March; 1.) you turn your car's AC up to MAX and leave it there til October and 2.) you get your flips on!

Oh yeah, they're cute

Honestly, what's not to love about flip-flops? You can easily afford to have a pair that matches every outfit, they are fast to put on when running late for the kiss-and-drop and you never, ever, ever have to worry about ruining them because you can get them for $7 at JCP anytime!

There is this, though 

I just about lived I flip flops until I started running and developed arch pain (planter fasciitis). I started looking into shoes and how to pamper and sustain good feet.  I learned to wear compression socks while running, never wear the same shoes 2 days in a row, oh and BTW, flips are terrible for you. Thanks a lot, Today... 


Never fear my flip-loving friends, I'm here to help! This very simple foot mask has helped me tremendously...


* 3 tablespoons Indian Healing Clay (aka  bentonite clay)
*3 tablespoons purified water (especially important if you have very hard water like we do in AZ)

Slather the mix onto to bottoms of feet and ankles. Put plastic veggie bags over your feet and wrap with bandages to create warmth. Wait about half-hour & scrub off. 

Don't forget: Drink lots of water whenever detoxing and use a very rich cream after your rinse and dry your feet. I like Eucerin Smoothing Repair because it is thick and really seals in the moisture of the lotion. 


May your pedi be pretty all Spring and Summer long!


Friday, March 25, 2016

MMM in Sedona- Red Jeeps, Red Rocks & a Vortex

Namaste from Sedona


Over the past several years, with the challenges of doing the wife/mom thing and looking straight at 40, I've become far more open-minded than the young me could have ever predicted. I've embraced yoga, whole foods and self-help books, all of which I'd once dismissed as 'hippie-dippy stuff'.
My bad. 
consider myself practically native to my beloved AZ, and have been to many of the must-see spots in the state thanks to my Grandma & Grandpa M!
Unfortunately, I was not exactly attentive and/or particularly impressed on our southwest summer road trips. I was far more interested in friends, boys and nail polish than cliff dwellings or swirling centers of energy. In my defense, I was a teenager
As I've traveled to different places, I've occasionally been a bit sheepish about my lack of knowledge about my self-professed home state. Obviously, it's time to subject my little sweeties to Southwest Road Trips (With a Special Arizona Focus)!
It's my turn now. 

Red Rock Jeep Tour
Anyone who has heard of Sedona has probably heard of the Pink Jeep Tours. However, since our Little Tyke is crazy about RED Jeeps with no doors and a tire on the back, pink lost out! 
We took the Cowboys & Canyons tour with Charlie. He looked like a Wild West cowboy and was just as knowledgeable. Our gang loved the beautiful, bumpy ride ride, full of fun facts about different trees and rock formations. The climb up to "Whiskey Bill's" cabin was only mildly nerve-wracking and the bouncy jostle down was my little guys road trip high-point! 
We had an especially awesome experience with Red Rock Jeep for two reasons. First, they were super patient with our lateness. Sedona is usually a bit less than two hour drive from Phoenix but traffic construction, a bad accident and Spring Break Traffic added an extra hour+.They held our spot without complaint and were even helpful with the maddening parking situation. Secondly, our guide stopped to pick up a distinctly ill young woman and her slightly panicked friend and gave them ride down the trail to their car. I'm quite glad my kids got to see an act of kindness/love your neighbor moment in action. Bravo, Cowboy Charlie!
I absolutely recommend a jeep tour, especially if you'd like experience the absolute joy of 4x4 action and the trails with no hiking or sleeping in a tent required!


Sedona is well-known for its tranquil, spiritual energy which can be felt throughout the town but many believe originate from certain areas referred to as Vortex. There are several known vortex spots and we'd heard the Airport Vortex mentioned frequently. As it was also the closest, MrDad agreed to drive us up the high, winding road and keep an eye on the Little Tyke. There was a large parking lot that was nearly deserted at about 9:30 a.m. The view was truly magnificent and the air was clear, crisp and scented by the many evergreens. 
Sassy was surprisingly enthusiastic about our vortex pursuit.
She found a rock that brought her a peaceful feeling and even seemed to follow her around. I felt more energy from an especially pleasant smelling Juniper tree.  
I thanked the tree & shared my water

This website was a wealth of interesting knowledge if you are thinking of having vortex hunt of your own!

Then Uptown shops were an absolute blast, though not at all suitable for a under-exercised first grader. Sassy and I enjoyed looking at Vortex rocks, Himalayan Salt lights and semi-precious stones by the millions. Sassy was intrigued by the Ostrich Jerky at one shop but quipped,"$17?! I'm not even sure if I'll like it! Even if I did it would be an expensive and unattainable craving. Best not to even get started." Wise words. 
Our Sedona shopping afternoon certainly did seem peaceful, but that could have had a lot to do with MrDad & LT exploring separately...


The best part? We were only there for about 24 hours... Imagine what we'll get up to on a proper Road Trip!

See you in Sedona!

Sunday, March 20, 2016

Purple-Gray Hair Mishap - #mmmpinwin

So. I'm not actually a natural blonde. There. I said it. I've colored my hair so passably for so long that most of my friends and acquaintances have forgotten, if they ever wondered in the first place, my original mouse-coat brown ever existed. 

Since I found this this little $8 box of awesome:


I've been pretty darn happy with my color. I mix it up per the box instructions and apply the color in rows, starting at my part and going all the way around from hairline to crown. I wait 20 minutes then gently comb to the ends for the last 5 minutes.

I have very straight, fine hair and I don't often style it beyond a comb-through with a wide-toothed comb immediately post shower. I also use good  conditioner, a hydrating detangler and (of course) a deep-treatment weekly. I'm shamefully proud of the compliments I get after I color, especially from really talented pros (Thanks, V). The longer it gets, though, the trickier home color gets.

I keep getting these streaks in the front fringe pieces and in the back. I've tried coconut oil on the spots I know to be prone to over saturation but it has a hit-or-miss success rate. Petroleum jelly worked really well but left the strands I coated super greasy for a few days. 

This last color was a streaky disaster. 


Splotchy, streaky and brassy... That's me!


I controlled my anxiety and got on Pinterest ASAP.  I found a lot of variations of the recipe to follow, but this lady's article was too cute and clever not to share. http://www.sparkpeople.com/mypage_public_journal_individual.asp?blog_id=2838366

Here's the Fix:


3 parts lemon juice, to one part conditioner. Mix together, coat affected parts of hair (or do your whole head!), let sit for an hour, then shampoo and condition as usual. Boom!

I made too much so I'll give it to Sassy and she can do a #mmmguestblog


It certainly worked and I love it when a pin comes together ;)


DIY Cellulite Wrap - #fail

It all started so beautifully...


I truly adore Pinterest. I'm the chick who always had a handmade French memo board overflowing with pages torn from a myriad of magazines and a "Projects" flash drive (or two). 


I love nothing more than to sit down after a long day of mommy-ing in my big comfy chair with an ultra light beer, and pin-pin-pin. Kids, Humor, Beauty, Geek, Crochet, Self-help. I'm all over the place... I love to pin! My problem? I never do the things
No more!
From now on I'm going to post a Pinterest win or #LFMF once a week. I hope there will be more wins than fail but with my track record don't count on it!


DIY body wrap using coffee
I really like theindianspot.com. They have so many great DIY's on Pinterest. You should check them out!
Ingrediants: *2 Tbsp. of coconut oil *1 Tbsp. of epsom salt *1 Tbsp. of ground coffee *2 Tsp of Cinnamon powder. Mix the ingredients well. It smells divine, sweet and spicy!
Next: After dry brushing my skin, I applied the mixture to my legs and massaged it into my skin in circular motions for several minutes. 

Here comes the tricky part: "Wrap your belly using a saran wrap." Sounds easy, but its SO NOT. First of all, the mixture was a crumbly mess and got all over the floor. Oh, the plastic wrap would not stick. Then, it kept rolling down. Lastly, this plastic wrap can now never be used by anyone else... draw your own conclusions, ladies.
I did not plan ahead here: "If required cover yourself with the warm blanket or hot towel over the wrap for 30 – 60mins. Doing this can effect a lot for your treatment." I've also heard of using ace bandages to wrap your legs and I wish I'd had them, but I didn't. So I used an old pair of too-tight capri work-out pants. 
Ugh: I thought that I'd clean the bathroom and get some other chores done to geneate some heat and aid the treatment. Yeah... no. I took three hobbling steps and the plastic wrap gave up the fight and rolled down to my knees. I yanked up the wrap, conceded defeat and sat on the side of the tub. It was not entirely unpleasant; I had a fully charged phone. I pinned some stuff.
FINALLY: "After 30mins, remove the wrap, rinse off the scrub with warm water and apply lotion." Let me tell you pulling off those manky old pants amidst a spray of coffee grounds and cinnamon and ripping off the crinkled, itchy was one of the best feelings ever. Like, for REAL. I was so glad to rinse the mess off and took some time to smooth it all over my legs from ankles up. My skin was crazy smooth and smelled rather nice too. I put on my smoothing cream (Eucerin Smooth & Repair - next #mmmreview!) and got all excited for the big reveal...
(No pictures of my grody legs... you're welcome.)
Nothing. No change. I'm going to have to take the blame for this fail. Live & #LFMF, friends.
Talk to you soon!


Tuesday, March 15, 2016

Square-Bottomed Cinch Bag #mmmtutorial


I know it sounds like an old-timey swear, but they are actually adorable, see?

bought two sweet little white Bibles for my nieces this Easter and I thought it would be fun if they had a small, pretty bag to carry them in. So I created these easy to carry cinch sacks. They will be easy to customize with these little hair bows found because I don't know what color their Easter dresses will be, yet! It was super easy to create; it took about 2 DVR'd Grey's to work up... Or about 90 minutes if that's how you measure time. 

The supplies:
* about 1/4 ball of yarn
*J crochet hook
*embroidery needle to sew in ends
*stitch marker to keep track of rounds 
*at least 3 feet of ribbon 
*beads to secure ribbons (optional)


This is my very first attempt at an original pattern, so be kind :)

Abbreviations Used:
     ch --- chain
     Rnd(s) --- round(s)
     sc --- single crochet
     st/sts --- stitch/stitches
     dc --- double crochet
     slp st --- slip stitch


Part 1: Bottom of the bag


(I used 2 strands to make it a bit sturdier. I HIGHLY recommend it.)

Ch 16
Rnd 1-10:16 sc
Rnd 11: sc all the way around adding an extra sc at each corner (to create a slight rounding.)

Part 2: Body of the bag

(For the body I used a single strand, to create a softer, slouchy look.)

Rnd 12: sc around perimeter using only top stitch (see below) 


Rnd 13: dc around, ch 1
Rnd 14: sc around
Rnd 15: dc around, ch 1
Rnd16: sc around
Rnd 17: dc around, ch 1
Rnd 18: sc around
Rnd 19: dc around, ch 1
Rnd 21: sc around
Rnd 22: dc around, ch 1
Rnd 23: sc around, ch 1
Rnd 24: (decorative shell edge) *5dc, skip 1 st, slp st in next, skip one st* repeat all the way around 

Part 3: The drawstrings. 

*Cut two lengths of ribbon about 18" or so. 
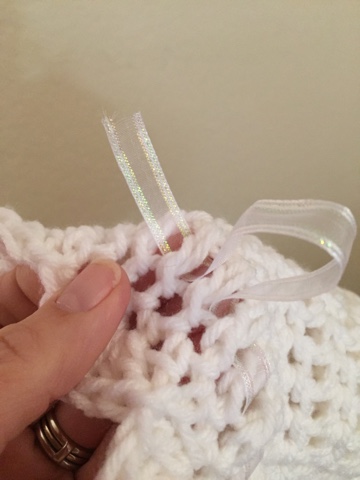
*Weave one length of ribbon entirely around the bag, through the last dc Rnd. Add a bead to the ribbons and then tie the ends of ribbon together.
* Run the second length of ribbon the same way, except start on the opposite side as the first length of ribbon; add the bead and tie the ends together.
* Trim the ribbon ends if necessary so that they are even.


Ta-da!


If you like this craft tutorial please let me know in the comments. Happy Easter!